
Imagine that you want to send your friend a file that contains private data like passwords for her or him to enter some application, banking transaction record or any other stuff that you wish it to be private. That would certainly be a nightmare , and in the era of global privacy issues, this scenario is becoming increasingly expectation rather than speculation.Facebook CEO Mark Zockerburg confession that Facebook doesn’t have a strong reputation for building privacy protective services is still scary evidence to many users!.
Kleopatra crypto manger from gpg4win is very effective, easy to use encryption tool. Any file extension ends with .gpg will cause despair to even the most experienced hackers!. For mac users there is GPGtools that provide same encryption/decryption tool.
OK, You got my attention!, the software seems useful, how to use?
gpg4win installation is straightforward. After the software is installed successfully, you will need to create what is known as the “Key pair” which are the Public and Private keys. Public key is generated by the user and its purpose is to latterly be spread to all your contacts, social media friends…etc. It will be used by them to encrypt any file they intend to send to you. Similarly if the user (you) needs to send a file to any of your contacts, then you should have the public key of that particular contact. this means that you(the user) and your contacts should be using gpg4win Kleopatra tool.
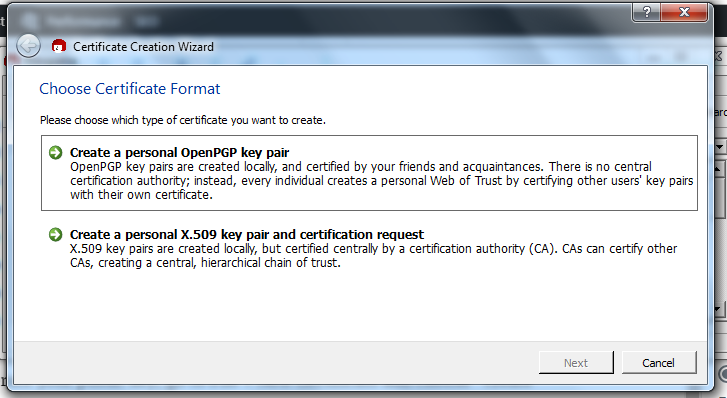
To generate your public key, go to File > New Certificate and choose “create a personal OpenPGP key pair(by the do not think that I am mistaken to write PGP and GPG, they are the same!!, PGP is for “Pretty Good Privacy” and GPG is for “Gnu Privacy Guard”. Gnu Project people are playful and this is life!!)
After fill the required field like name and email, go to “Advanced setting to set up the type and strength of your encryption”, one can leave this option as default but many users rise the encryption strength. You can set encryption type between RSA and DSA . Also user can set the strength of the encryption, and for internet slow connection, one can go for the default strength. In the same advanced options screen, user can specify the usage of the certificate. Users may check the “signing box” if the certificate to be used for digital signatures or authentication. Also users can set the expiry date for the certificate, so if you intend the certificate to be valid indefinitely, leave the expiry date box unchecked. When fished click “OK” then click “next”.

Now you will get the final review screen , click “create key”. You will then be offered an additional level of security when asked to add a “pass-phrase”. It is a password that will be prompted every time you decrypt new file from a contact.

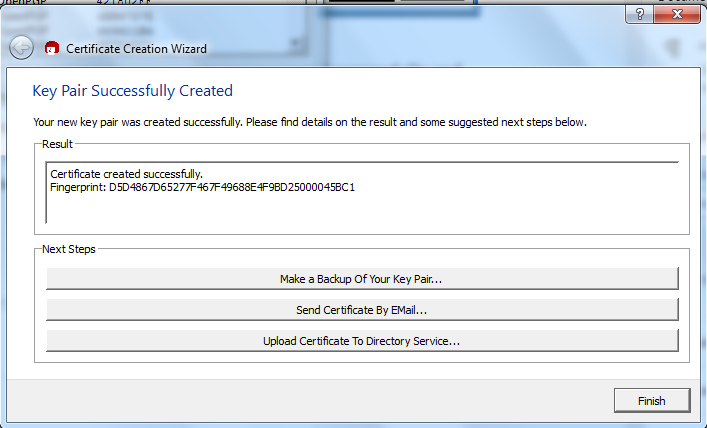
Now you are done!, the public key certificate is generated successfully and the private key is generated behind the scene along with the public key. You will be now offered the next steps such as make a backup of the private (which I advice you keep it in a secure storage and not share it with any third party!) , or send certificate by emil or to Directory service.
OK, I did it all, now how to send my contacts my public key certificate?
Go to the main window and choose “all certificates”. Find your certificate, highlight it then go to File> Export certificates and export it , send the exported file to your contacts so they use it to encrypt any data they need to send.
To decrypt the received filed from your contacts, which are in gpg file format. Just right-click on the file you want to decrypt, click “decrypt and verify”. At this point you will be prompted of the pass-phrase and the decrypted file will show up in the same place of the original .gpg file.